Selecting and using magnetic compasses
by tonytran2015 (Melbourne, Australia).
Click here for a full, up to date ORIGINAL ARTICLE and to help fighting the stealing of readers’ traffic.
#find North, #finding North, #compass, #select, #use, #operate, #North, #magnetic.
Selecting and using magnetic compasses.
A magnetic compass uses the local magnetic field generated by the rotating core of the earth to give the rotational axis of the earth. The two directions are reasonably close.
The magnetic compass is a secondary directional instrument to people who can observe celestial bodies for navigation but is a primary practical directional instrument to people who cannot observe any Celestial body. (Gyro-compasses are too expensive for most people).
Here is the list of desirable features for selecting a compass and different usage modes of magnetic compasses.
A compass should have at least the following desirable features:
1. Robustness,
2. Durability,
3. Wide operational conditions (being stable despite harsh operating conditions),
4. Accuracy (being true and sensitive),
5. Simplicity,
6. Portability, and
7. Versatility.
1. Robustness.

Figure 1:(Left to right) Tiny liquid filled disc compass, simple compasses with and without needle lock.

Figure 2: A HAZARDOUS Chinese imitation of the German Kasper & Richter Meridian sighting compass, the imitation has its graduation markings self-detached after only washing by clean water from a tap! The black markings on the white rotating dial under the top circular glass can be seen lying randomly after peeling off.
A serious compass should be able to withstand falls of 2m into boxes of sands, to withstand hot and cold environmental temperatures, to withstand immersion in water, to withstand strong sunlight.
The liquid inside a liquid filled compass reduces stresses on the pivot caused by linear acceleration on the mass of the compass needle assembly; this makes the compass more robust. Serious dry compasses should have needle locks to remove acceleration stresses on pivots.
Liquid filled compasses should have pivots with spherical heads. These spherical heads need to be covered by lubrication fluid in operation but last longer than those with pointed conical head.
The Chinese, tiny (originally liquid filled) compass of Figure 1 has completely dried up after about one year of usage. However, it can still correctly point North when given gentle vertical vibration during use.
Figure 2 shows a hazardous Chinese imitation of the German Kasper & Richter Meridian sighting compass, the imitation has its graduation markings self-detached after only washing by clean water from a tap! The black markings on the white rotating dial under the top circular glass can be seen lying randomly after peeling off. (The blue line markings are mine to show what were there). This may lead to a SERIOUS situation to its inexperienced user while in the field. This type of products should be banned in Western countries.
2. Durability.

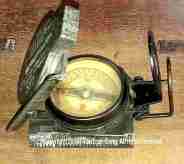
Figure: An old ex-US Army lockable dry compass (made around 1965, initially known as M-1950 compass) from disposal stores remains robust and can keep on working although the clear glass has become partially clouded.
Any serious and expensive compass should withstand the passage of time (being durable).
Some types of PVC materials disintegrate with time. Some clear plastic may become cloudy with time. Some liquid filled compasses leak and dry up with time. The needle points of some dry compass may rust away with time.
3. Wide environmental tolerance in many modes.

Figure: A Chinese lensatic compass with unreadable direction graduation due to wrong focal length of its lens. The round sighting lens has to be disassembled and reground and it is placed on the clear dial near to the 260 degree position of its rotating compass rose. ===>> All functioning parts of any compass must be tested before taking it to the field!
A compass should function even in non-level position or with highly inclined magnetic field, with unsteady hand holding, in cold or hot temperature, at normal or high altitude, when submerged in water, during the day or at night.
It should be able to function in its different operation modes.
Conical cup bearing on needles are more tilt tolerant. Low center of gravity of a needle allows the compass needle to resist the vertical tilt of any highly inclined magnetic field. Liquid filled compasses with non-flexible liquid capsules need to have allowance for non-interfering bubble or have undulating flexible bottom to allow volume change of the fluid. Temperature extremes and external atmospheric pressure can change the volume of the fluid and make liquid filled compasses leak. Any air bubble in its liquid capsule will reduce the till tolerance of a liquid damped compass. A capsule with air bubbles inside will cave in under external pressure and may crack when used for diving.
Mirror compasses also allow magnetic readings free from users’ own magnetic field.
Testing for tilt tolerance:
Tilt the compass in various directions until contact friction affects the reading. Work out the angle of tilt that still allow smooth operation of the needle. Work out the pitching of the needle due to the pitching of magnetic field. Check if this pitching can cause contact friction between the needle or compass rose plate and the case.
Night vision:
Night vision can be provided with either phosphorescent paint or radiation illumination. Phosphorescence requires energizing by a torch for few seconds every hour. Radiation is only acceptably safe if it is from Tritium.
4. Accuracy.

Figure 1: Horizontal rotation test to detect resolution and cogging.

Figure 2: Japanese compass with agate jewel. The bearing on its rotating disc has an agate center, in contrast to the Chinese compass of Figure 1 with all metal bearing (no jewel).

Figure 3: Japanese compass with agate jewel. The bearing on its rotating disc has an agate center, in contrast to the Chinese compass of Figure 1 with all metal bearing (no jewel).
a. The compass should correctly show the magnetic North. (I have seen some cheap liquid damped compasses with the needles glued to the disks with enormous errors of about 20 degrees from their intended positions!)
b. The readings should then increase or decrease by values equal that caused by the horizontal rotation of the aiming line. This is required for interchangeability of data.
Accuracy test.
– Draw two pencil lines intersecting at right angle in the center on a piece of paper.
– Place the paper on a flat table face with one of the line accurately aligned along the magnetic field.
– Place the compass at the intersection at the center of the paper and read the direction of the needle relative to the pencil line.
– Smoothly rotate the compass case in one direction about the needle pivot to discover any cogging caused by any inappropriate use of magnetic material in the case. The induced eddy current in the non-magnetic material is too weak to cause any cogging. An accurate compass should not have any cogging.
– Smoothly rotate the compass case in the other direction about the needle pivot to discover any cogging caused by any inappropriate use of magnetic material in the case.
– Let one pointed magnetic pole of a long magnet comes gradually close to the compass along a spiraling path and check if one of two ends of the compass needle points exactly at it.
Without accuracy, your compass may send you astray by up to 20 degrees !
Accuracy test is a difficult one. It requires a uniform magnetic field with known orientation and strength. The magnetic needle of the compass should be symmetrically manufactured and magnetized. We must first eliminate compasses with obvious manufacturing defects on needle (being non-symmetric, badly mounted to the rotating needle disk). Accuracy requires:
1/- The dial must be circular and evenly graduated.
2/- The pivot of the needle must be exactly at the center of the circular dial and the pivot to be at right angle to the dial surface for the reading to be correct.
3- The magnetic needle must be metalurgically symmetric with respect to its center line.
With all different orientation of an accurate compass the two ends of the magnetic needle point to readings with difference of 180 degrees all the time. Even if a magnetic needle looks externally symmetric, its material properties may not be uniform. The metallurgical and mechanical history of a piece of material will definitely affect its magnetic properties. Only sprinkled iron powder can reveal the magnetic field of a compass needle. For this reason users have to stay away from cheap compasses with needles made from steel off-cuts and scrap materials as the needles may not be able to be magnetized to bear symmetric magnetic field.
If your compass is accurate it should give the accurate magnetic declination figure for your area from Sunrise and Sunset directions or from True North given by your street maps. The yearly figures for magnetic declination can be found from the internet for comparison.
Some quality compasses can provide accuracy of up to one degree. This gives accurate identification of destination and reduces unnecessary turnings. Accurate direction is vital when calling for base support.
Resolution test:
This test finds out how much change in direction can remain undetected by your compass.
1/- Find a level, steady surface, away from any magnetic source to place the compass .
2/- Set the compass sight on some easily seen object.
3/- Rotate compass anti-clockwise by about 90 degrees. Slowly and gently rotate the compass back into sighting position aiming at the same object. Write down the first reading for bearing.
4/- Rotate compass clockwise by about 90 degrees. Slowly and gently rotate the compass back into sighting position aiming at the same object. Write down the second reading for bearing.
5/- The two readings should differ by no more than 2 graduation units.
The difference is called the resolution of the instrument. A respectable instrument maker would not give a finer scale than the instrument can ever resolve! If the resolution is less than half a unit, the reading is meaningful to the last graduation unit.
The Japanese lensatic compass in figures 2 & 3 has jewel bearing at the center of the compass needle to reduce rotational friction. This is clearly shown in contrast to the cheap Chinese compass of figure 1.
5. Versatility.

Figure: Simple compass made of steel needle, clear plastic capsule, glass mirror and flexible case. This compass is not liquid damped, has no jewel bearing, and its mirror has no see through hole for aiming. It is NOT a serious compass !

Figure: A low cost 75mmL X 40mmW plastic mirror-compass with thermometer and relative hygrometer on its top cover. The inside of the top cover has a bright 75mm X 40mm metal mirror.
Extra features like mirror, lenses may help with grooming, fire making, observation, signaling.
Figure 3 of Step 1 shows a design with a bull eye for leveling and a vertical scale. Vertical graduation and accurate leveling of base allow determination of elevation.
The sighting mirror of the mirror compass in figures 1 and 2 of step 8 can also be used as a signaling mirror and personal mirror. This feature was favoured in the 1940’s.
Being waterproof and unsinkable
This is a requirement for adventurers, hikers and fishermen. If the compass is waterproof and light, it can float in water. A number of liquid filled compasses with plastic cases are light and can be made unsinkable if glued to some thick sheets of light styrene foam.
6. Simplicity.

Figure 1: A simple, plastic compass based on the Suunto compasses for touring. Please note that this imitation compass may be neither as durable nor as reliable as the genuine one.

Figure 2: A simple, plastic compass based on the Suunto compasses for touring. Please note that this imitation compass may be neither as durable nor as reliable as the genuine one.

Figure 3: A simple, plastic compass based on the Suunto compasses for touring. Please note that this imitation compass may be neither as durable nor as reliable as the genuine one.

Figure 4: A high quality Suunto compasses for marine, professional and outdoor use (Image added after 2018 May 07).
A well made, simple compass rarely has malfunction and the first sign of any malfunction is obvious to see.
Liquid filled compasses will show bubbles when any liquid is lost and the malfunction and loss of robustness are gradual.
7. Portability.
A compass should be light and small enough to be carried around.
Robust but cumbersome or heavy compasses make users unnecessarily tired, I would not carry them. They are only good for laboratories or surveying teams.
If a compass has a holding ring or carrying string/strap, I would tie a string to that and pull the ring/string/strap with 10 times the weight of the compass to test its strength (10g acceleration endurance) before use, to prevent loss of the compass during field use.
8. Find North by a Compass: Magnetic and True Norths.

Figure: True North, Magnetic North and Magnetic Deviation.
Obtain the magnetic deviation for your area. This deviation is commonly between (-45) degrees and +45 degrees and it slowly changes to a new value every year. The deviation is obtainable from the internet or by the method given in reference [2]. Positive magnetic declination means the Magnetic North is on the East of True North.
If you have a really erasable marker for your top glass/plastic dial, you can use it to mark the magnetic deviation from the long marking line for True North on your compass dial. The marking has to be erased and redone when the deviation has changed significantly. If you don’t want to mark on the dial, you can stick a tape on the underside of the compass and write clearly on it something like “MD = (-1)deg” (This is only an example value, your value is different).
Every time you use the compass, you only need to align the needle/rose to your marking on the dial and the long line for True North on your compass is already aligned.
If you do sighting using a compass with a rotating compass rose which always points to magnetic North, just read the graduation on the card and ADD the signed magnetic declination to it.
9. Precaution against magnetic anomalies.

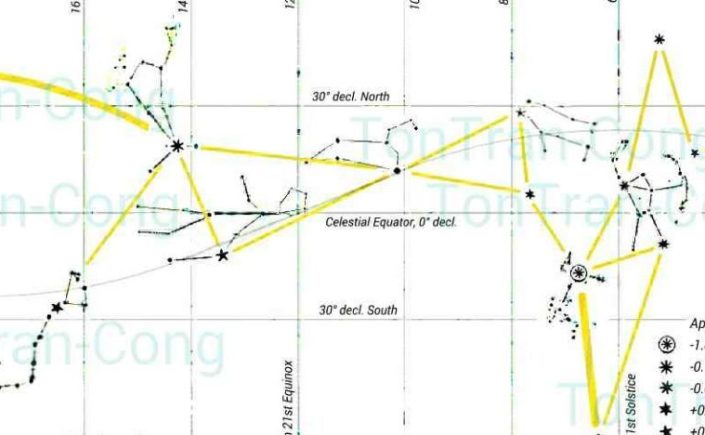
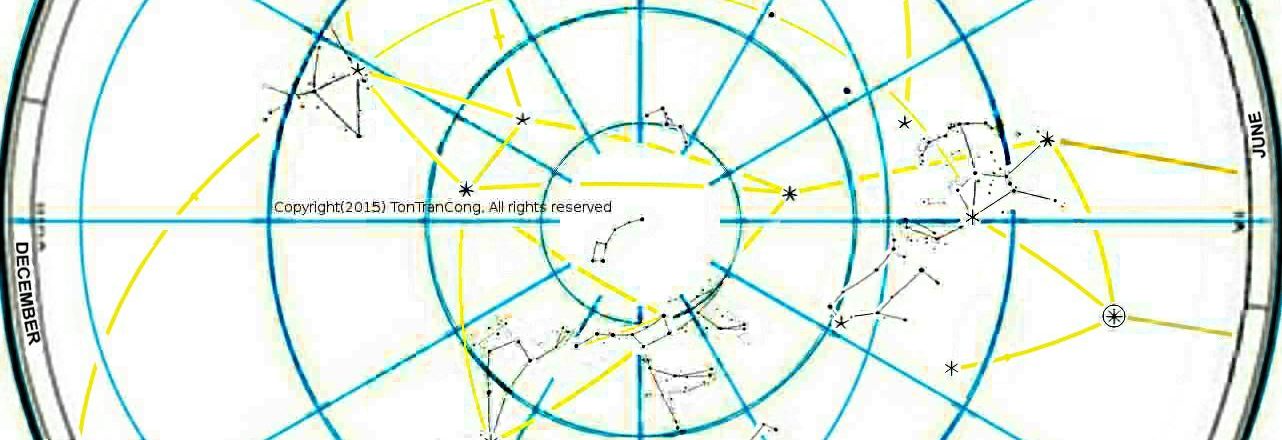
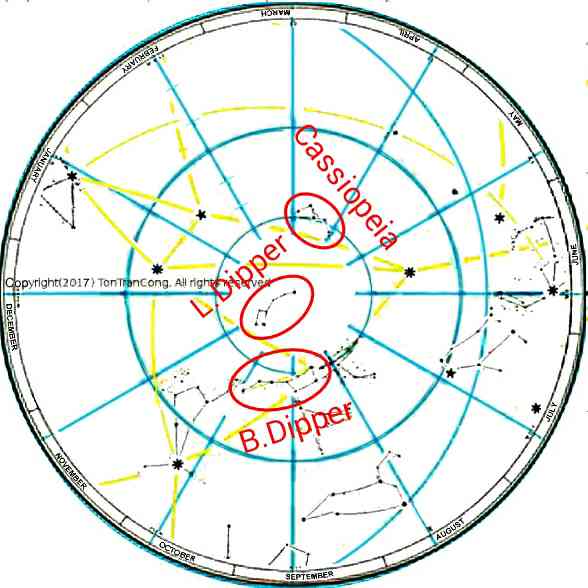
Figure: Cross checking directions with those from a Celestial method whenever possible is a desirable habit. This illustration is from reference [7].

Figure: Cross checking directions with those from a Celestial method whenever possible is a desirable habit. This illustration is from reference [4].
Besides magnetic deviation caused by the core of the earth, there are also deviations near ground surface caused by man-made objects and ore bodies. These are called “Magnetic Anomalies”. An anomaly produces non-parallel magnetic field lines and non-constant magnetic field strength.
The following steps help to detect any magnetic non-uniformity in order to detect such anomalies and to avoid disorientation when using a magnetic compass (A magneto-meter is better for this detection as it supplies the extra accurate value of field strength but it requires batteries.).
1/- Count the yaw and pitch oscillation frequencies of the needle of any new compass. Write them on a piece of paper for future reference.
2/- Check the polarity and the yaw and pitch frequencies before packing the compass for any trip. If the frequencies have decreased the needle may have lost part of its magnetism and re-magnetization may be needed.
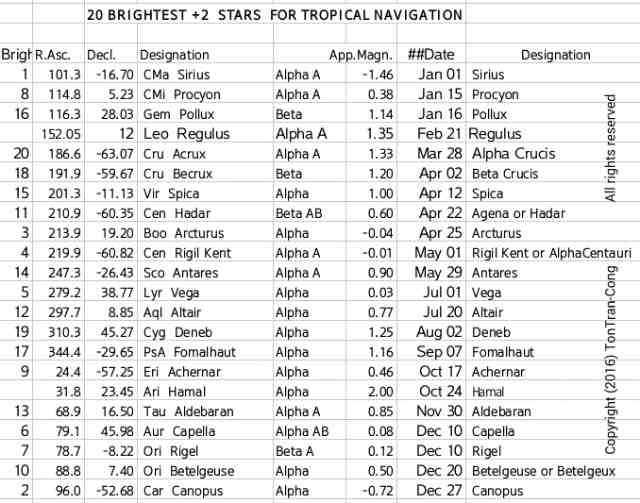
3/- Have a habit of cross checking directions with those from Celestial methods (given in references [4,5,6,7]) whenever the Sun or the Moon or bright stars can be seen. The cross checking with the direction determined by the method given in [7] also verifies that your watch is still working.
4/- Frequently take the bearing of your destination in both standing and crouching/sitting positions (with different heights), even if you are confident of your current position. This ensures that your compass is ready when needed and you are prepared against any sudden loss of visibility (due to change in weather, terrain, falling down a crevice! . . .). Any quick change in magnetic direction with height or with horizontal travel distance usually reveals a very strong, meter-scaled magnetic anomaly. The anomalies may be caused by buried metal objects (steel-reinforced bunkers, car bodies, tank bodies, unexploded bomb-shells!, magnetic ores,…) or even induced magnetic field from high voltage power lines.
5/- If anomaly is suspected, count the yawing frequency of the needle. The external field strength acting on the needle is proportional to the square of this frequency. For example, if the frequency goes up by 2, the external magnetic field strength may have gone up by 4.
6/- Distant objects such as mountain peaks, light houses, transmission towers can help detecting the sudden change in magnetic deviation when you travel. The magnetic bearings of these distant objects should only change slowly. If there is any sudden change in their bearings you may have to check the accuracy of your compass or the change in magnetic deviation.
Note:
Compasses are usually NOT suitable for rail travelers as the carriage bodies and the rails underneath it creates magnetic abnormality.
10. A special mode of operation to reduce own influence.

Figure 1: Plan view of a plastic mirror compass. The mirror is opened by 110 degrees from its close position.

Figure 2: End (operational) view of the same mirror compass. The mirror is opened by 45 degrees from its close position. The clear capsule should be rotated by the thumb until the fluorescent double II marking on it is on top of the North end of the needle. The compass should be hold in the air by the hand of a stretched arm.
Using the Mirror Sighting compasses.
The Mirror Sighting compasses are for a special mode of operation with reduced influence from user’s magnetic field. This feature allows the compass to be used with stretched arms keeping it away from the user’s body. A mirror compass is used in the following way:
Hold the mirror compass at your eye level, horizontally level on one stretched arm, away from your head, with the mirror tilted from the vertical by 45 degrees to let your eyes see the reflection of the working horizontal needle and dial of the compass. Take aim of the destination by the aiming guide and observe the horizontal magnetic needle through the mirror. Rotate the rotating dial on top of the needle to mark the position of the needle. For accuracy, keep the vertical marking line on the mirror superimposed on the aiming diameter of the horizontal dial of the compass. Finally bring the compass to your comfortable reading distance to read the marked position of the needle. The magnetic bearing of the aiming line is the value on the scale at the point nearest to the mirror.
This is a desirable feature if the user carries magnetic items and it is not practical for him to take off these items when using the compass. The sighting mirror can also be used as a signaling mirror and personal mirror. This feature was favoured in the 1940’s.
The compass in figure 2 has only a very crude aiming guide. It follows the design of Silva Trekker compasses.
Using the lockable compasses.

Figure 3: Hand posture for holding type M-1950 compass for sighting with a stretched arm. The finger through the brass ring is the middle finger. The sighting is carried out using the slit in the sighting tab and the wire in the lid. The lens has no function in this sighting mode. This is my own novel mode of operation not designed by the makers of type M-1950 compasses.
Any tilt tolerant, lockable compass can also be used in this mode (with reduced accuracy) even without any mirror. Tilt tolerance ensures that the needle can point North before the lock is engaged to freeze it in place. The ex_US Army compass (model M-1950) in figure 1 of Step 2 can be used in this mode, and is surprisingly accurate, as it is tilt tolerant and the inertia of its rotating compass rose ensures that the needle orientation is retained while the lock is engaging. A lockable M-1950 compass is used in the following way (This is my own novel mode of operation, not designed by the makers of type M-1950 compasses. Do NOT complain to them that their compasses are not comfortable to use in this way!) :
Place the lid and the sighting tab of the M-1950 compass in vertical positions to have the compass in unlocked and operating condition. Turn the holding ring near the sighting tab fully downward. Curl the middle finger of your hand and stick it through the holding ring of the compass. Grip the compass by pressing the end of the index finger against the lid hinge and the joint of the thumb against the sighting hinge. Stretch your arm while holding the lensatic compass horizontally level at the height of our eyes, away from your head, with its lid vertical and its lock still fully disengaged (sighting tab in vertical position).
Take aim of the destination by the aiming guide then hold till for 3 seconds. Gently engage the lock (push the sighting tab into horizontal position) by only raising only the first joint of your thumb to push against the bend of the sighting tab while keeping the rest of the body motionless. After having been locked, the whole compass is bought to your comfortable reading distance to read the locked position of the needle. The magnetic bearing of the aiming line is the value on the compass rose at the point nearest to the hinge. It is hard to read but is definitely readable even with the sighting tab fully down.
11. Special Operating mode 2: Using small, fluid deficient compasses.

Figure 1: A two years old Chinese key-ring compass (with diameter of about 20mm) has visible air bubbles. Some bubbles or all bubbles may stick under the compass disc, under the S.

Figure 2: A two years old Chinese key-ring compass (with diameter of about 20mm) has visible air bubbles. Some bubbles or all bubbles may stick under the compass disc, under the SW.

Figure 3: The compass is tilted by 100 degrees to have all bubbles collected at the upper side of the compass disc.

Figure 4: All gas/air is now above the compass disc.
A fluid deficient liquid filled compass should be repaired and refilled with the same type of fluid to restore its original, designed performance. However, a small such compass can still be used in reduced performance mode (for emergency) employing the following work around.
The capsule of of the liquid filled compass should be held upright. It is then tilted 100 degrees from its upright position to let any bubbles from underneath its compass rose (rotating disk) escape to the space at the top of the (now vertical) rim of the rose. The capsule is then tilted back to its upright position, ensuring that all air stays above the rotating rose. With all air expelled to the top of the compass rose, the latter can rotate although with reduction in accuracy because of undue tilting torque exerted by air bubbles.
Gentle tapping and vibration in the direction of the pivot axis will free the rose in multiple short time intervals while it travels/bounces between extreme positions. This is sufficient to make the magnetic needle of the rose point close to magnetic North.
Any small, completely dried, liquid filled compass may be made pointing North by such gentle vibration/rattling.
The method in this section may not be applicable to large marine compasses without Cardan gimbal mounts!
12. Special Operating mode 3: Using compasses balanced for the other hemisphere.
The magnetic field generated by the interior of the Earth looks like that of a giant dipole magnet placed at the center of the Earth and of length equal to the radius of the Earth. At the equator the field is parallel to ground surface while it goes into the ground away from the equator.
On the Northern hemisphere the North end of a compass needle is pulled towards the ground while on the Southern hemisphere the corresponding South end is.
This may make the ends of a symmetric compass needle in a thin circular compass touch the upper or lower part of the case, causing dragging friction.
The problem has two simple solutions for compass makers. Firstly the center of gravity of the needle should be made much lower than the tip of the pivot. Secondly, one needle end can be made heavier than the other to resist the pitching caused by the inclination of the magnetic field.
Most compass buyers live in Northern hemisphere so compass makers tend to make their products work from the equator to about 60 degrees Northern latitude. They just simply make the South ends of their compass needles heavier than the North ends. The so made compasses are said BALANCED for Northern hemisphere. You can notice that the North ends of their needles mostly rise up when used near the equator.
When these compasses are brought to the Southern hemisphere the South ends of their needles are pulled even further down, resulting in dragging.
A user on the Southern hemisphere may have to hold his compass case at angle to avoid dragging or to RE-BALANCE the needle by wrapping some copper wire around the Northern half of the compass needle.
Re-balancing requires delicate work on the compass and requires opening it every time you move to the other hemisphere. Here I offer a very effective and simple method of using the same compass in both hemispheres.
My solution is to magnetize the light end of the needle to be a North pole when in the Northern hemisphere and a South pole when in the Southern hemisphere. (The colour on the needle should now only mean a light or a heavy end.)
The method and the simple tools to re-magnetize a steel compass needle has been described in a previous Instructables posting, reference [1].
A compass with non-steel needle cannot be re-magnetized by this method.
Please leave any comments and suggestions here so that the posting can be improved !!
References.
[1]. tonytran2015, Beware of perilous flips by magnetic compasses, survivaltricks.wordpress.com, Beware of perilous flips by magnetic compasses, posted on June 14, 2016.
[2]. tonytran2015, Determining local magnetic declination by a magnetic compass, survivaltricks.wordpress.com , Determining local magnetic declination by a magnetic compass, posted on March 31, 2016.
[4]. tonytran2015, Finding directions and time using the Sun and a divider, survivaltricks.wordpress.com , Finding directions and time using the Sun and a divider., posted on May 6, 2015.

[5]. tonytran2015, Finding North direction and time using the hidden Sun via the Moon, survivaltricks.wordpress.com, Finding North direction and time using the hidden Sun via the Moon . Posted on July 6, 2015.
[6]. tonytran2015, Finding North direction and time by stars, survivaltricks.wordpress.com, Finding North and time by stars. Posted on August 28, 2015
[7]. tonytran2015, Finding accurate directions using a watch, posted on May 19, 2015 .


Added after 2018 Feb 19:
[8]. “The compass was first used in India, around 1800 BC, for Navigational purposes and was known as “Matsya yantra” (which roughly translates to fish machine) because of the placement of a metallic fish in a cup of oil. The use of the magnetic compass started from 4th century in china, where a type of magnetite known as “lodestone” was used as a tool in a kind of divining magic, Geomancy. The Chinese were the first ones to have mastered the use of magnetic iron for navigation, which then rapidly spread to Europe and beyond.”, .https://knowledge4civil.wordpress.com/2017/07/23/types-and-uses-of-compass/
[9]. https://misfitsandheroes.wordpress.com/2018/01/15/fat-boys-magnetism-and-magic/
RELATED SURVIVAL blogs
Determining local magnetic declination by a magnetic compass, posted on March 31, 2016,
Finding North with a lensatic compass, posted on August 21, 2017
Beware of perilous flips by magnetic compasses, posted on June 14, 2016

Indian-mariners-had-first-use-of-magnetic-navigational-compasses,
Shadow stick navigation and graph of solar paths, posted August 19, 2016

Measuring angles and distances for outdoor survival, posted on June 29 2016 ,

Finding North direction and time using the hidden Sun via the Moon . Posted on July 6, 2015. This is a useful technique.
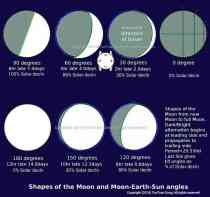
Finding North direction and time using the Moon surface features. Posted on July 1, 2015. This is a useful technique.

Finding North direction and time using geological features, plants and animals, posted August 04, 2017

Navigating with an AM MW radio receiver, posted January 17, 2017 The Scorpius constellation, posted January 8, 2017, The Orion constellation., posted December 26, 2016, Rice as emergency food., Using GPS in off-grid situations, Slide Sky-Disks with grid masks showing azimuths and altitudes, Slide Sky-Map for displaying tropical stars.
Click here for my other blogs on  SURVIVAL
SURVIVAL BLOG

SURVIVAL CONTENTS BLOG IMAGE OF SURVIVAL CONTENTS
MONEY BLOG

MONEY CONTENTS BLOG IMAGE OF MONEY CONTENTS
SOCIAL ISSUES BLOG

SOCIAL ISSUES CONTENTS BLOG IMAGE OF CONT. OF SOCIAL ISSUES
LIVING BLOG LIVING CONTENTS BLOG IMAGE OF LIVING CONTENTS
HOW TO BLOG HOW TO CONTENTS BLOG IMAGE OF HOW TO CONTENTS
ARCHIVAL HOME PAGE CONTENTS HOME PAGE BLOG IMAGE OF CONTENTS HOME PAGE


 Home Page (Navigation-Survival-How To-Money).